How do I create a Report?
Quick Navigation
Accessing Reports
Designing Reports
Choose Fields
Choosing FieldsConfiguring Fields
Saving
Filters and Settings
Results Filters
Results Ordering
Results Per Page
Report Name
Permissions
Report Complete
Actions and Results
Refresh Results
Download Excel
Download CSV
Copy Report
Accessing Reports
To get to the Reports page, click the Reports link in the Menu bar on the top right.

In this page, you will be able to see any public reports that you have access to. Access to reports is determined by the permission groups. You will also be able to see any private reports that you have created. To create a new report press the Add Report button, this will take you to the Report Designer.
Designing Reports
Choose Fields
Choosing Fields
After clicking Add Report you will be taken to the the first screen of the Report Designer, Choose fields. In this screen you will be able to select the fields you need to include in the report, change the order in which they appear, and, if necessary, give them custom names.
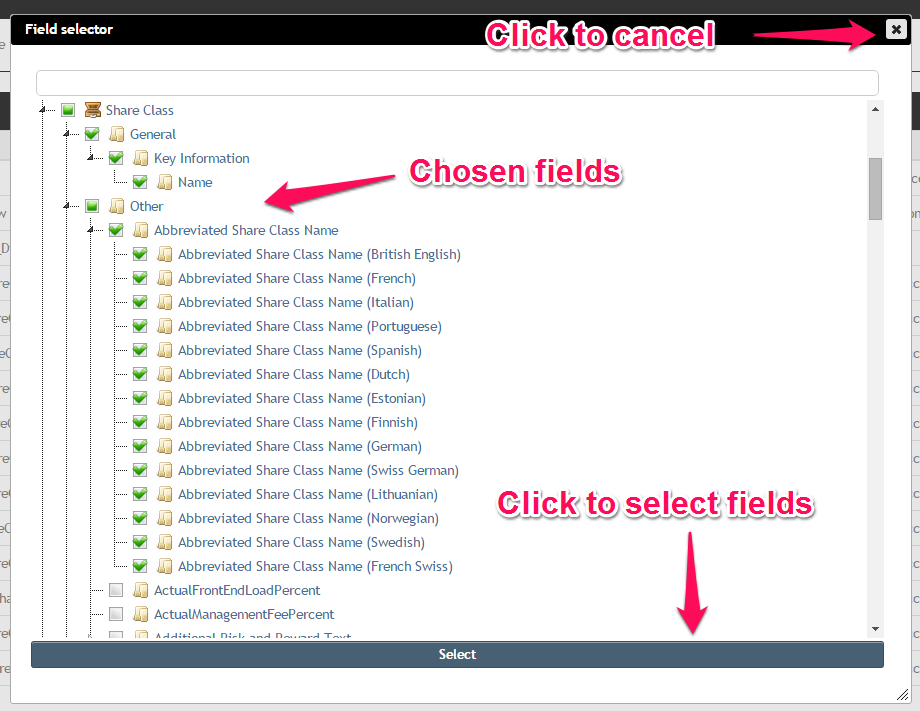
You'll first be shown an empty list of of fields, with the option to choose the fields you want to include, clicking the icon will open the Field Selector

With the Field Selector open you can expand individual entities (e.g. Fund, Share Class, etc) to find the fields you need to include on the report. The location of fields is controlled by the entity they are for and their Path, as set in the Admin area. For example, a field called Name for a Share Class, with a Path of General\Key Information\ would appear in the Field Selector under the node named Share Class, then the node named General, then finally the node named Key Information.
http://i.imgur.com/2BNk3p9.png
You can also search for fields by name, simply by typing in the search bar at the top of the field selector. This will filter to those fields that contain the typed text in their name, path, or description. To clear the search and display all fields again just delete the text in the search bar.
At any time you can hover over a field and, after a short delay, information will be shown about that field to help you determine whether it's a field you need to include in the report.
http://i.imgur.com/skMDNPV.png
Having found a field to be included, it can be chosen simply by checking the checkbox next to its name. Multiple fields can be chosen by checking each of their checkboxes. Multiple fields in a group, or for an entity, can be easily chosen by checking the appropriate node. For example checking the box next to Share Class would choose all fields of a Share Class, checking the box next to Key Information under Share Class would select only the Key Information fields of a Share Class.
Once all the fields for the report have been chosen click Select at the bottom of the Field Selector, this will confirm that those are the fields to be included in the report. At any time the fields to include can be changed by opening the Field Selector, checking and unchecking the fields then clicking Select again. If you click the cross at the top of the Field Selector it will close, discarding any changes to your field choices.
Configuring Fields
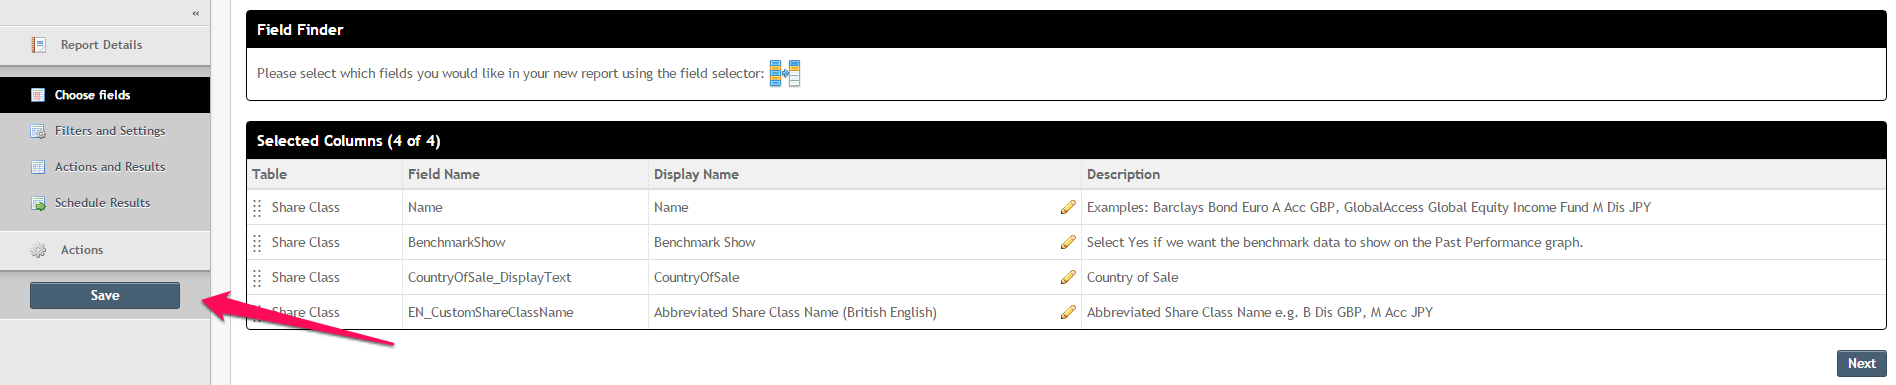
Having selected the fields to be included they'll now be display in a list, in the order they'll appear in the report, with some information to make each field easy to identify.
Initially only 15 fields are displayed, you can use the Show More and Show All links in the bottom-right to either show another 15 fields, or show all available fields. The numbers in the bottom-left of the page indicate how many fields are currently being shown on the page and how many fields will be included on the final report.
Using the handles to the left of each field you can drag and drop fields up and down the list to change the order in which they'll appear. You can also change each field's Display Name by clicking on the pencil icon in the Display Name column. That switch the Display Name into edit mode where you can change it to be what you need, then either click the check icon to confirm the change, or the cross icon to discard it.
Once you've finished configuring the fields you can either click Next to move to the next step, or click the Filter and Settings button in the Report Details section in the sidebar.
Saving
You can, at any time after Choosing Fields, decide to save the report. By clicking the Save button in the sidebar the report will be saved and ready for use. Clicking the Save button multiple times will overwrite the report with the latest design, to create a copy without affecting the original see the later Copy Report section.
Filters and Settings
On the Filters and Settings page you can customise the results of the report, including or excluding records based on certain filters, ensuring results show up in a certain order, or that only a certain number of results are displayed on each page within Fundipedia. You can also give the report a name, making it easy to find later, and assign it to a specific group of users so only they can see and run it.
Results Filters
Results Filters allow you to customise the records you'll get back in your report. Multiple filters can be grouped together so complex reports can be built with minimal effort. To start with clicking Add Filter Group will add an initial group into which you can add specific filters and adds a placeholder for the first filter you'll add.

You can choose which field to filter on by clicking the Field Selector icon, similar to how fields were selected when Choosing Fields. This pops up the Field Selector again, but restricts the fields to just those related to the entities you're reporting on. For example, if you only selected Share Class fields when Choosing Fields then you'll only see Share Class fields here, if you chose both Fund and Share Class fields then you'll see both Fund and Share Class fields here.
This Field Selector only allows you to choose a single field at a time, simply check the field you want and click select, just as you did previously. As before, hovering over a field will display the popup with additional information to help you make the right selection.
With a field selected the filter changes to display the path and name of the field along with the filter options and filter value. The filter options provided will vary based on the type of field selected, so not all filter options will be available for every filter.

Filter Options
- Is Empty Or Null - include records where the field doesn't contain a value, or that value is blank
- Is Not Empty Or Null - include records where the field does contain a value, and that value is not blank
- Is Null - include records where the field doesn't contain a value
- Is Not Null - include records where the field contains a value, even if that value is blank
- Equals - include records where the field exactly matches a particular value
- Does Not Equal - include records where the field does not exactly match a particular value
- Begins With - include records where the field starts with a particular value
- Contains - include records where any part of the field contains a particular value
- Does Not Contain - include records where any part of the field does not contain a particular value
- Contains Any - include records where the any part of the field contains one of a number of comma separated values
- Contains All - include records where any part of the field contains all of a number of comma separated values
- Ends With - include record where the field ends with a particular value
- Is Less Than - include records where the field value is less than a particular value
- Is Less Than Or Equals - include records where the field value is less than, or equals, a particular value
- Is Greater Than Or Equals - include records where the field value is greater than, or equals, a particular value
- Is Greater Than - include records where the field value is greater than a particular value
- Is In - include records where the field value is any one of a number of comma separated values
- Is Not In - include records where the field value is not any one of a number of comma separated values
- Is Within the Last Year - include records where the field value is a date within the last year
- Is Within the Last Month - include records where the field value is a date within the last month
- Is Within the Last Week - include records where the field value is a date within the last week
- Is Within the Last Day - include records where the field value is a date within the last day
- Is Within the Next Day - include records where the field value is a date within the next day
- Is Within the Next Week - include records where the field value is a date within the next week
- Is Within the Next Month - include records where the field value is a date within the next month
- Is Within the Next Year - include records where the field value is a date within the next year

Once you've selected the appropriate filter option for the type of filter you want you can enter a static value that will be used by the filter. For example, having selected the field Name and the filter option Contains you could enter the word Euro as the filter value so the report will only return records where the Share Class' Name field contains the word Euro.

Not all filter options require a value, for example, selecting Is Not Null Or Empty instead of Contains will cause the report to display records where the Share Class' Name field contains anything at all, we don't have to enter a specific value for that

Filters can be removed by clicking the red cross at the end of the filter row. Similarly, filter groups can be removed by clicking the red cross at the top of the group
You can add multiple filters to a group by clicking the Add Filter link at the bottom of the group, this adds another filter that you can configure using the steps above.
When you have multiple filters you need to decide whether how they link together, this is done using the AND/OR dropdown next to each filter. If you choose AND the report will only return records that match both fitlers (or all filters where there are multiple ANDs). If you choose OR the report will return records that match either filter. The more filters you add the more complex the report, but the more precise you can be in the records returned.
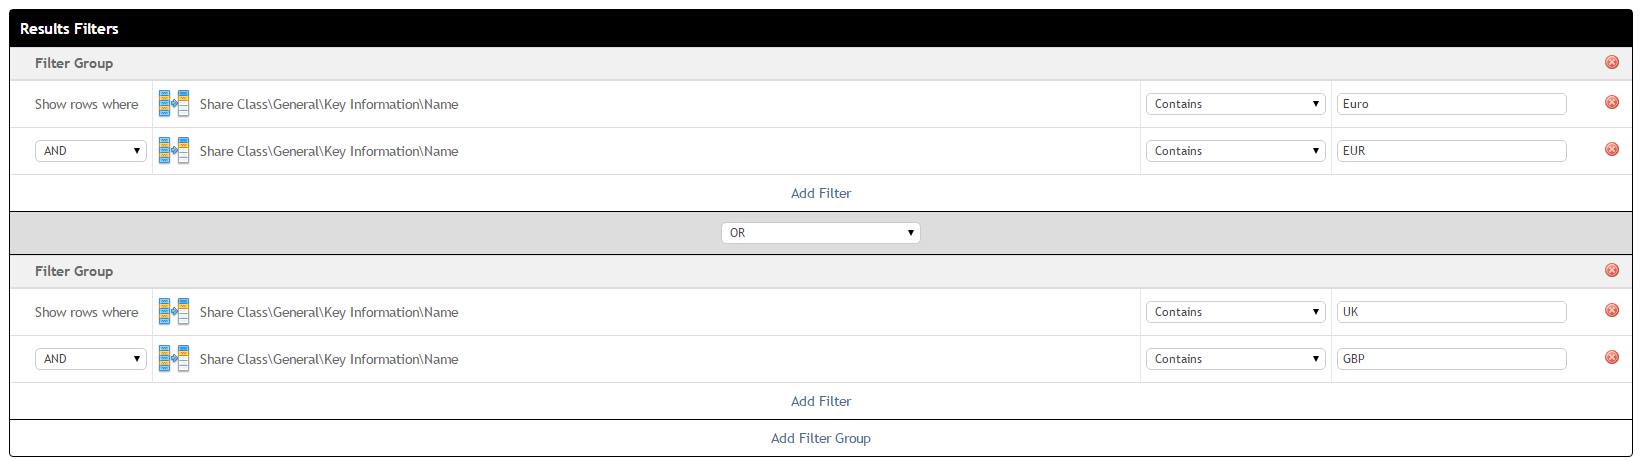
For example, you may want a report to return only the Share Classes that have the word Euro and EUR in their name:
There may come a point at which one filter group doesn't give you enough flexibility. For example, you may want a single report of all Share Classes where the name contains the word Euro and the word EUR, as well as all the Share Classes where the name contains the word UK and the word GBP. When this happens you can add another filter group with the additional filters. Simply click the Add Filter Group button again, which will create your new group, then add your additional filters to that group. You chain the groups together in the same way as filters, by choosing from the AND/OR dropdown between the groups.
Results Ordering
Results Ordering allows you to sort the results returned by the report according to different fields. As with the Results Filters you simply use the field selector to select which field you want to sort by and that displays it here. You can choose whether to sort the results from lowest to highest (ascending), or highest to lowest (descending) but using the dropdown at the end of the row.

You can add multiple fields to sort by simply by clicking Add sort column and repeating the process. Results will be sorted by each field in turn and, as when Configuring Fields you can change that order by dragging and dropping the rows using the drag handles.

A default sort column is chosen initially by the report designer itself as all reports must define at least one column they're sorted by.
Results Per Page
Results Per Page defines the number of records that will be shown on each page of the report when the report is shown within Fundipedia, this can be any number between 1 and 200.

Report Details
Report Details contains:
The custom name you can use to later identify your report. This is the name that will show up in the report list for users to see.
A description for the report, that will be used on the report list.
Tags that will be attached to the report, which will appear in the report list.

Permissions
Permissions dictate the groups of users that will be able to see and run the report. The View permission and the Edit permission are separate. The default permission for View is "Me", which will prevent any users other than myself from viewing the report. The default permission for Edit is "Anyone who can view", which when paired with the default View permission means only you can view and edit a report by default. From the dropdown of each permission, you can select what group you would like to be able to View and which one you would like to be able to Edit. It is possible to set up a report so everyone can view but only a specific group can edit.
https://s31.postimg.org/wrtzh5v89/permissions.png
Report Complete
With the report fully configured you can click either the next button at the bottom of the page or the Actions and Filters button in the sidebar. You can also at any time click to go back to Choose Fields this will preserve everything on the Filters and Settings page as much as possible, typically only removing filters if you change field selections so that those filters could no longer be applied.
Actions and Results
Actions and Results is the page that will show you the final output of running the report you've designed. It'll allow you to download it in different formats and also copy it in the event you want to create another similar report.
If you open an existing report you'll be taken to this page by default so you can see the results of running the report, download it, etc. However the other report designer pages are still accessible via the sidebar and links at the bottom of the page, allowing you to further customise or modify your report as needed.
Refresh Results
Clicking this button will re-run the report, retrieving the latest results from the server. Those results will be formatted and displayed on the page, with the number of records being shown dependent on the Results Per Page setting. When there are multiple pages of results a paging control will be shown in the top-right and bottom-right of the results pane.
Download Excel
Clicking this button will re-run the report and download the results to an Excel xlsx file. The field display names will be used as column names, with each field being a separate column and each record a separate row, as you'd expect.
Download CSV
Clicking this button will re-run the report and download the results to a text file. The fields in the file will be comma-separated, with each field value enclosed in double-quotes ("), each row will be separated by a carriage return and line feed (i.e. Windows line ending format). The first row of the file will contain the field display names, again comma-separated and enclosed in double-quotes.
Copy Report
Clicking this button will copy the current report configuration and save it as a new report. It will include any changes since the last save but won't overwrite any existing reports. Once the new report has been created a link will appear at the top of the page allowing you to load the new report.

This can be useful for creating multiple similar reports with slight variations or when editing a report and you want to save your changes without overwriting the original.